|
|
Then remember these top 10 basic digital photography tips to help you take eye-catching pictures and avoid the most common picture taking mistakes.
Basic digital photography tips
Tip # 1. Read your digital camera manual
This way, you'll know the features of your digital camera and how to use them. Know what modes are available, and if there are shortcuts on how to access them. Remember the features offered by your camera so that when the time comes, you'll be prepared.
Tip # 2. Keep the camera steady as you press the shutter
One of the most important basic digital photography tips, regardless of your camera's model, features, etc. is to keep your camera as steady as possible as you press the shutter. Many photos are ruined by shaky hands.
Here's how to adapt the right posture:
Stand with your feet shoulder-width apart, with your best foot slightly forward. Keep your elbows close to your sides and steady the camera by holding it right up to your eye. Press the shutter gently with the pad of your index finger.
Or better yet, use a tripod.
Tip # 3. Compose your subject and the other elements carefully in your frame
Good composition is the difference between an ordinary shot and a great one.
When you compose a picture, there should be a clear subject or a clear focus of interest. When people look at your photos, they should know the most important part or the central idea you want to convey immediately.
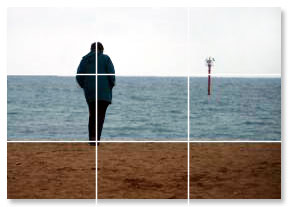
Ever heard of the rule of thirds? If not, then think of a tic-tac-toe board. The four lines intersect at four points, right? Now, the rule of thirds states that you should put your subject in any of these 4 intersection points. Meaning, you shouldn't put your subject right in the middle of your photo. It's better to put your subject slightly off center.
To illustrate, take a look at the ff:

In the above photo, the man is our subject. It's more pleasing to put him slightly off-center than to put him at the middle of the photo.
Of course, the rule of thirds is not the only rule of composition. But it is one of the most basic digital photography tips you should remember especially when you're starting out.
Ok, then...
Tip # 4. Keep an eye on the lighting
Generally, the best time of the day to take pictures is in the early morning or late afternoon for more balanced illumination. At this time, the sunlight isn't too glaring and doesn't cast dark shadows on your subjects.
If you must take a picture during mid-morning or mid-afternoon, try to ensure that the sun is on your own back and not on the back of your subject. Otherwise, your subject's face will become too dark to see.
Or better yet, position your subjects at an angle to the sun, so that their faces are well-lit, plus they are not squinting against the bright light.
If that's not possible, then use flash to fill in the shadows.
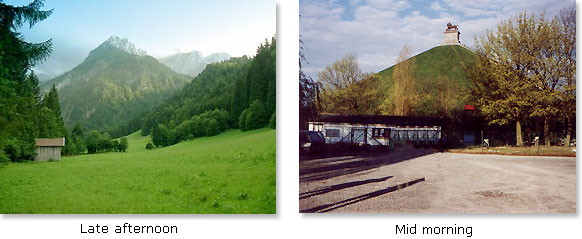
Lighting is especially critical when shooting landscapes. You'll find that the most dramatic times to shoot landscapes are during the early morning and late afternoon. The landscape is bathed in soft light. Unlike during mid-morning and mid-afternoon where the sun is harsh and so bright. There are shadows and the light is unevenly distributed.

Compare the above two photos. Notice the shadows in the right photo?
For more basic digital photography tips on landscapes, check out the landscape digital photos page.
Tip # 5. Use the night mode when taking photos in the dark
What if you're taking pictures at night or in a dark surroundings? Should you still use flash?
It depends where your subject is located. If your subject is near, then you can use flash. But if your subject is far away (more than 13 feet ), then using flash won't be of much help. In this case, it's better to turn off the flash and capture the scene using the existing light.
Also, does your camera have a night mode? If so, then use the night mode when photographing in the dark. In this mode, the camera sets a slower shutter speed than in ordinary shooting. This captures more of the scene, and not just dots of light as in the other modes.

Tip # 6. Keep the background simple when taking portrait photos
This removes the background distraction and draws the eyes to the person in the portrait.
That leads us to...
Tip # 7. Capture the natural expression of people
When photographing people, it's best to capture their natural and unposed expression. This will make your portraits more alive.
And be careful with color reflection. Brightly colored, or neon colored objects may reflect unnatural colors on your subject's face. Keep your subject away from reflective beach mats, automobiles, and other colorful, shiny objects which may spoil your picture.
Tip # 8. Add a frame to architectural photos
Photographing buildings or tall structures? Make them more striking by finding an architectural feature to serve as a frame. A frame adds more depth to a photo. Like this one:

Scene won't fit in your viewfinder? Then shoot two or more overlapping shots and merge these digital photos later using your computer.
Tip # 9. Use a fast shutter to capture action shots
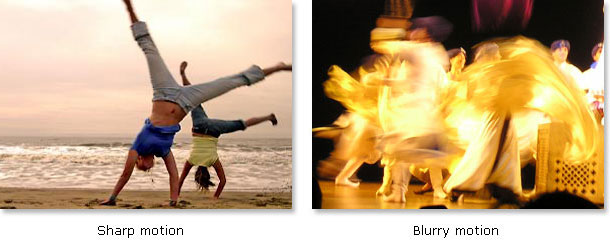
When photographing a moving subject, use a fast shutter speed to freeze the motion. Otherwise, the moving subject will appear blurry. Better yet, pre-focus on the subject by pressing the shutter halfway while keeping the subject in focus. Then press the shutter all the way to take the picture.
Compare these two photos. The left one is sharper and the motion was frozen. Unlike the right one where the photo came out blurry.

Tip # 10. Use the macro mode when shooting close ups
Shooting close-ups or macro photography is one of the more fascinating forms of photography. Imagine getting an insider access of the secrets of nature and see their innermost beauty up close.
Let's say you want to photograph a flower. To add more impact, switch to your camera's macro mode. It is usually represented by a flower icon in your camera's controls.
Next, zoom in really close and fill your frame with just one bloom. Focus on your subject. This will keep your subject sharp while the background slightly blurry. Then press the shutter.

Be very careful that you keep the camera steady, because a slight movement in the macro mode or whenever you're using zoom, will result in blurry digital photos.
There you have it!
The top 10 basic digital photography tips. Apply these basic tips and you'll be taking beautiful photos in no time.
What if you already applied the basic digital photography tips but still your photos are not picture perfect?
What if upon closer look, you notice some dirt or digital noise, the lighting or exposure is either too dark or too bright, and does your subject have red eyes?
If these things happen, don't worry. You can still correct them with a few mouse clicks using a photo editing software. Most photo editing software have built-in features to fix the red-eye syndrome, remove dirt and scratches, adjust the exposure, among others.
The bottom line...
Apply the basic digital photography tips you've learned
Remember the old saying "use them or lose them"? It's applicable to learning photography skills. So try to practice and use the above tips as guidance. But don't get too hung up with the technical details. Try to experiment as well. That's half of the fun in digital photography!
For more tips on composition, lighting, and how to take beautiful photos of people, nature, and night scenes, you might want to check out
Amy Renfrey's Digital Photography Success ebook.
She teaches beyond the basic digital photography tips to include taking wedding photos, dramatic landscape photos, and vivid flower photography, among others. It's a handy guide for any photography enthusiast or anyone who wants to capture breathtaking photos.
P.S. Is your digital camera's memory card already full of photos? If so, you might want to read
how to transfer digital photos
from your camera to your computer.
Return from Basic Digital Photography Tips to the Home Page